How to… Export Form Entries
 Web forms allow you to gather all sorts of information. But, aside from collecting information, your form plugin should also allow you to view entries as well as export them. Gravity Forms makes it easy to do both!
In this tutorial, we’ll take a look at why you may want to export form entries, how to use Gravity Forms to export form entries, and show you a few additional options for exporting gathered form data. Let’s begin!
Why Export Form Entries?
Gravity Forms is the #1 WordPress form builder on the market, enabling you to connect with your audience and effortlessly collect the information you need. However, data collection is only part of the path to success. To ensure your business achieves its goals, it is important that you can transfer your form data to the right platforms and services for the job.
Although Gravity Forms integrates with numerous third-party services, there may be situations where you want to use a platform that doesn’t have a purpose built add-on for our plugin. In this case, manually importing your form entries into another program, where you can manage them with ease, makes sense.
For example, you may want to export your form entries to your CRM so you can automate the follow up messages with potential clients and customers. Or you may want to export your entries so you can add them to your helpdesk software or accounting software.
If you have collected a high volume of submissions, or if your forms contain a large number of fields, then sorting through this data within your WordPress admin can also be frustrating, time-consuming, and ineffective – best move this data to a tool that will meet your business needs.
How to Export Form Entries With Gravity Forms
Now that we’ve covered why might want to export form entries, let’s look at the steps you’ll need to go through to do this. For the purposes of this tutorial, you’ll need Gravity Forms installed and activated on your WordPress website.
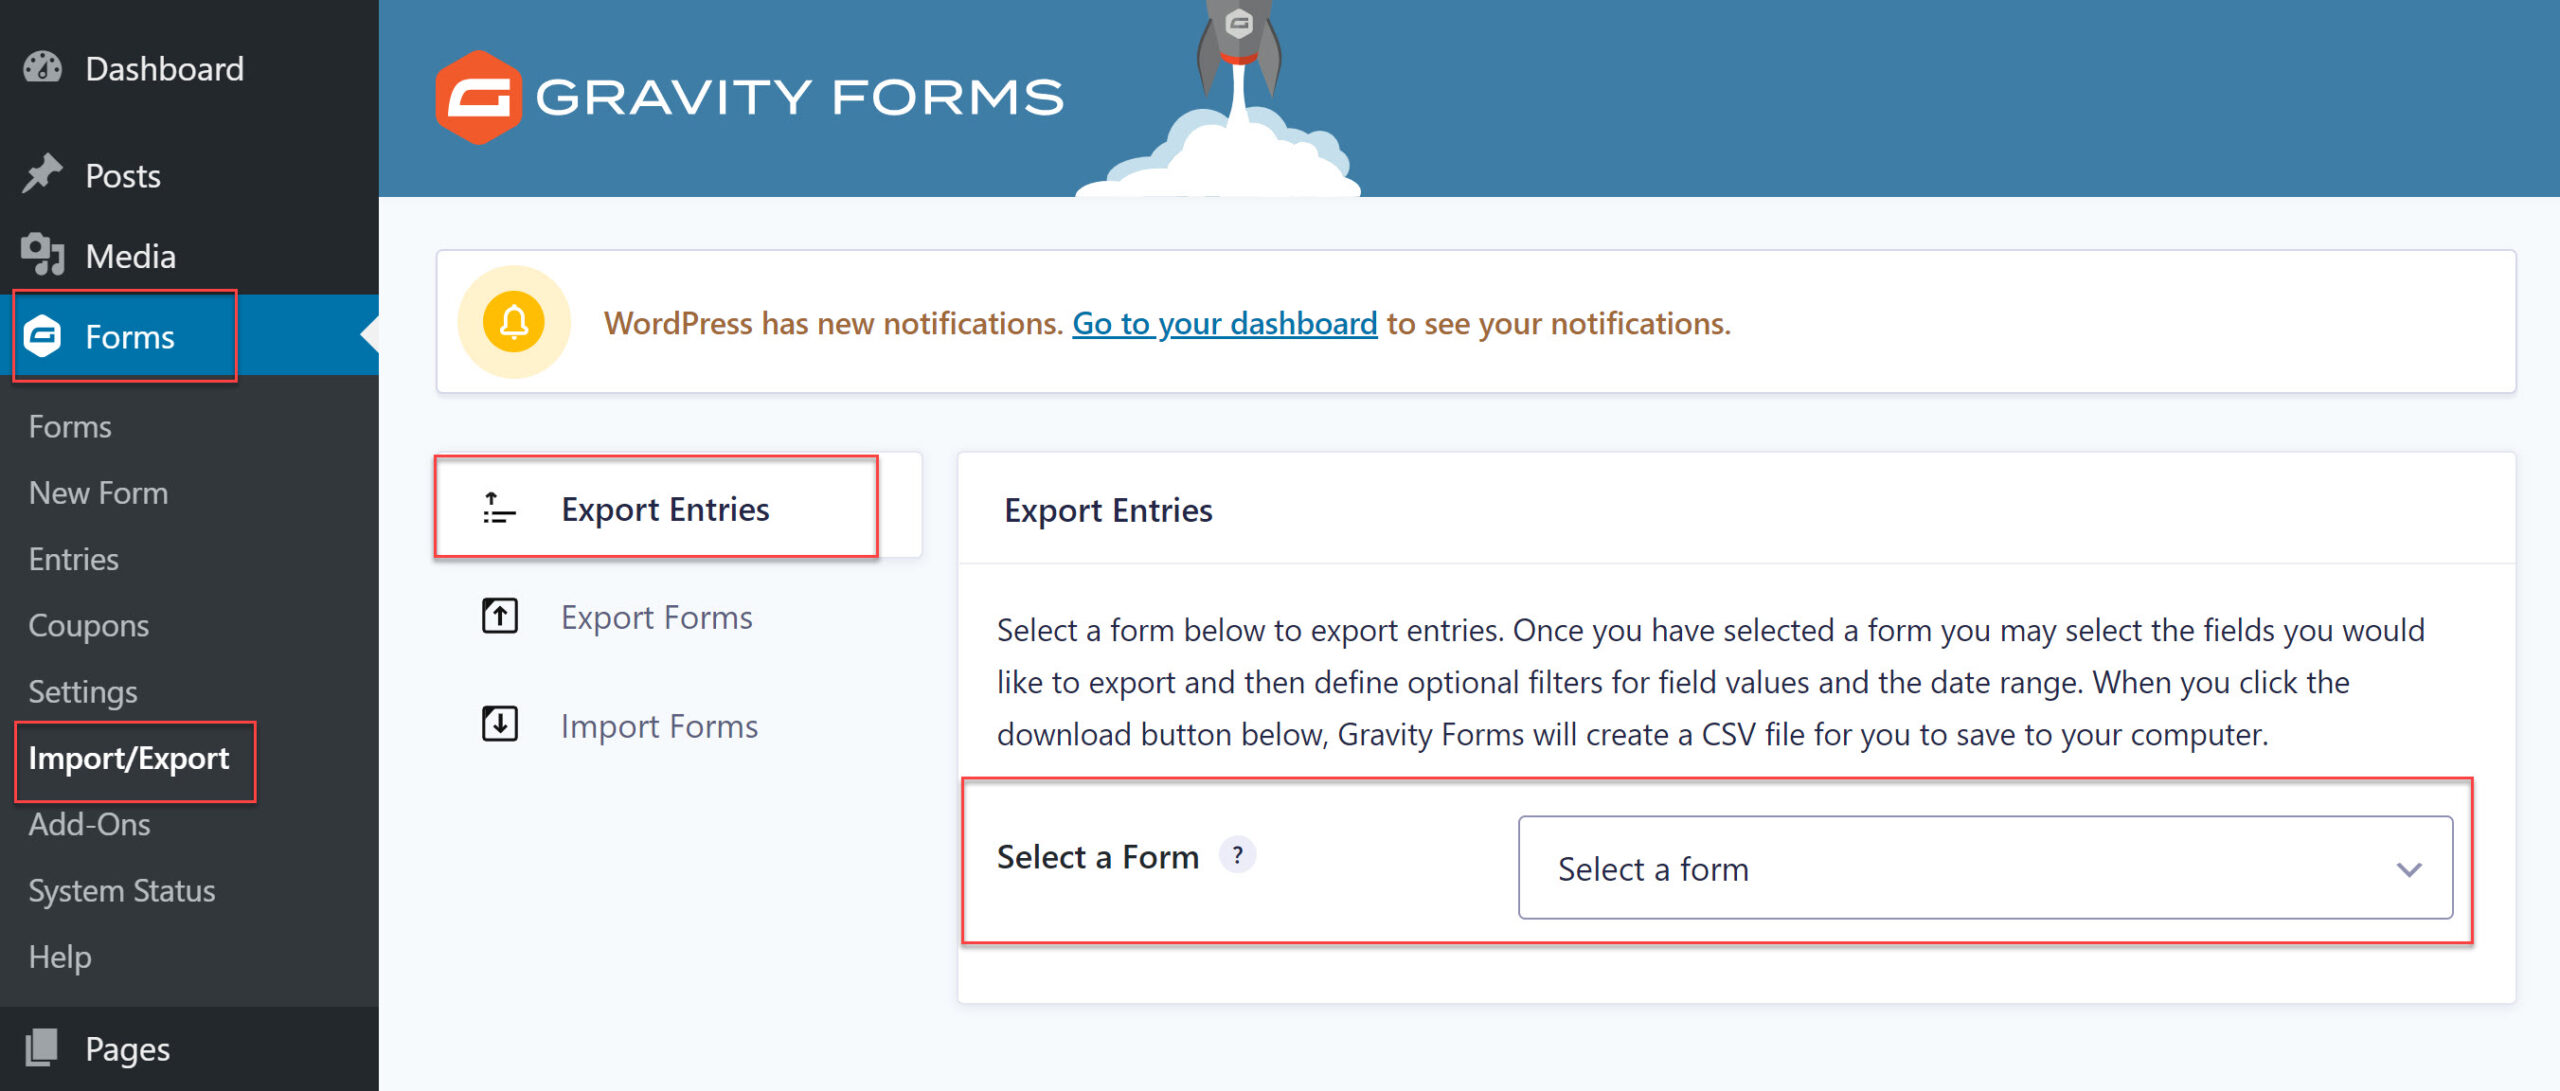
Step 1: Log In To Your WordPress dashboard
Start by logging into your WordPress dashboard and navigating to Forms > Import Export. Click on the first tab that says Export Entries.
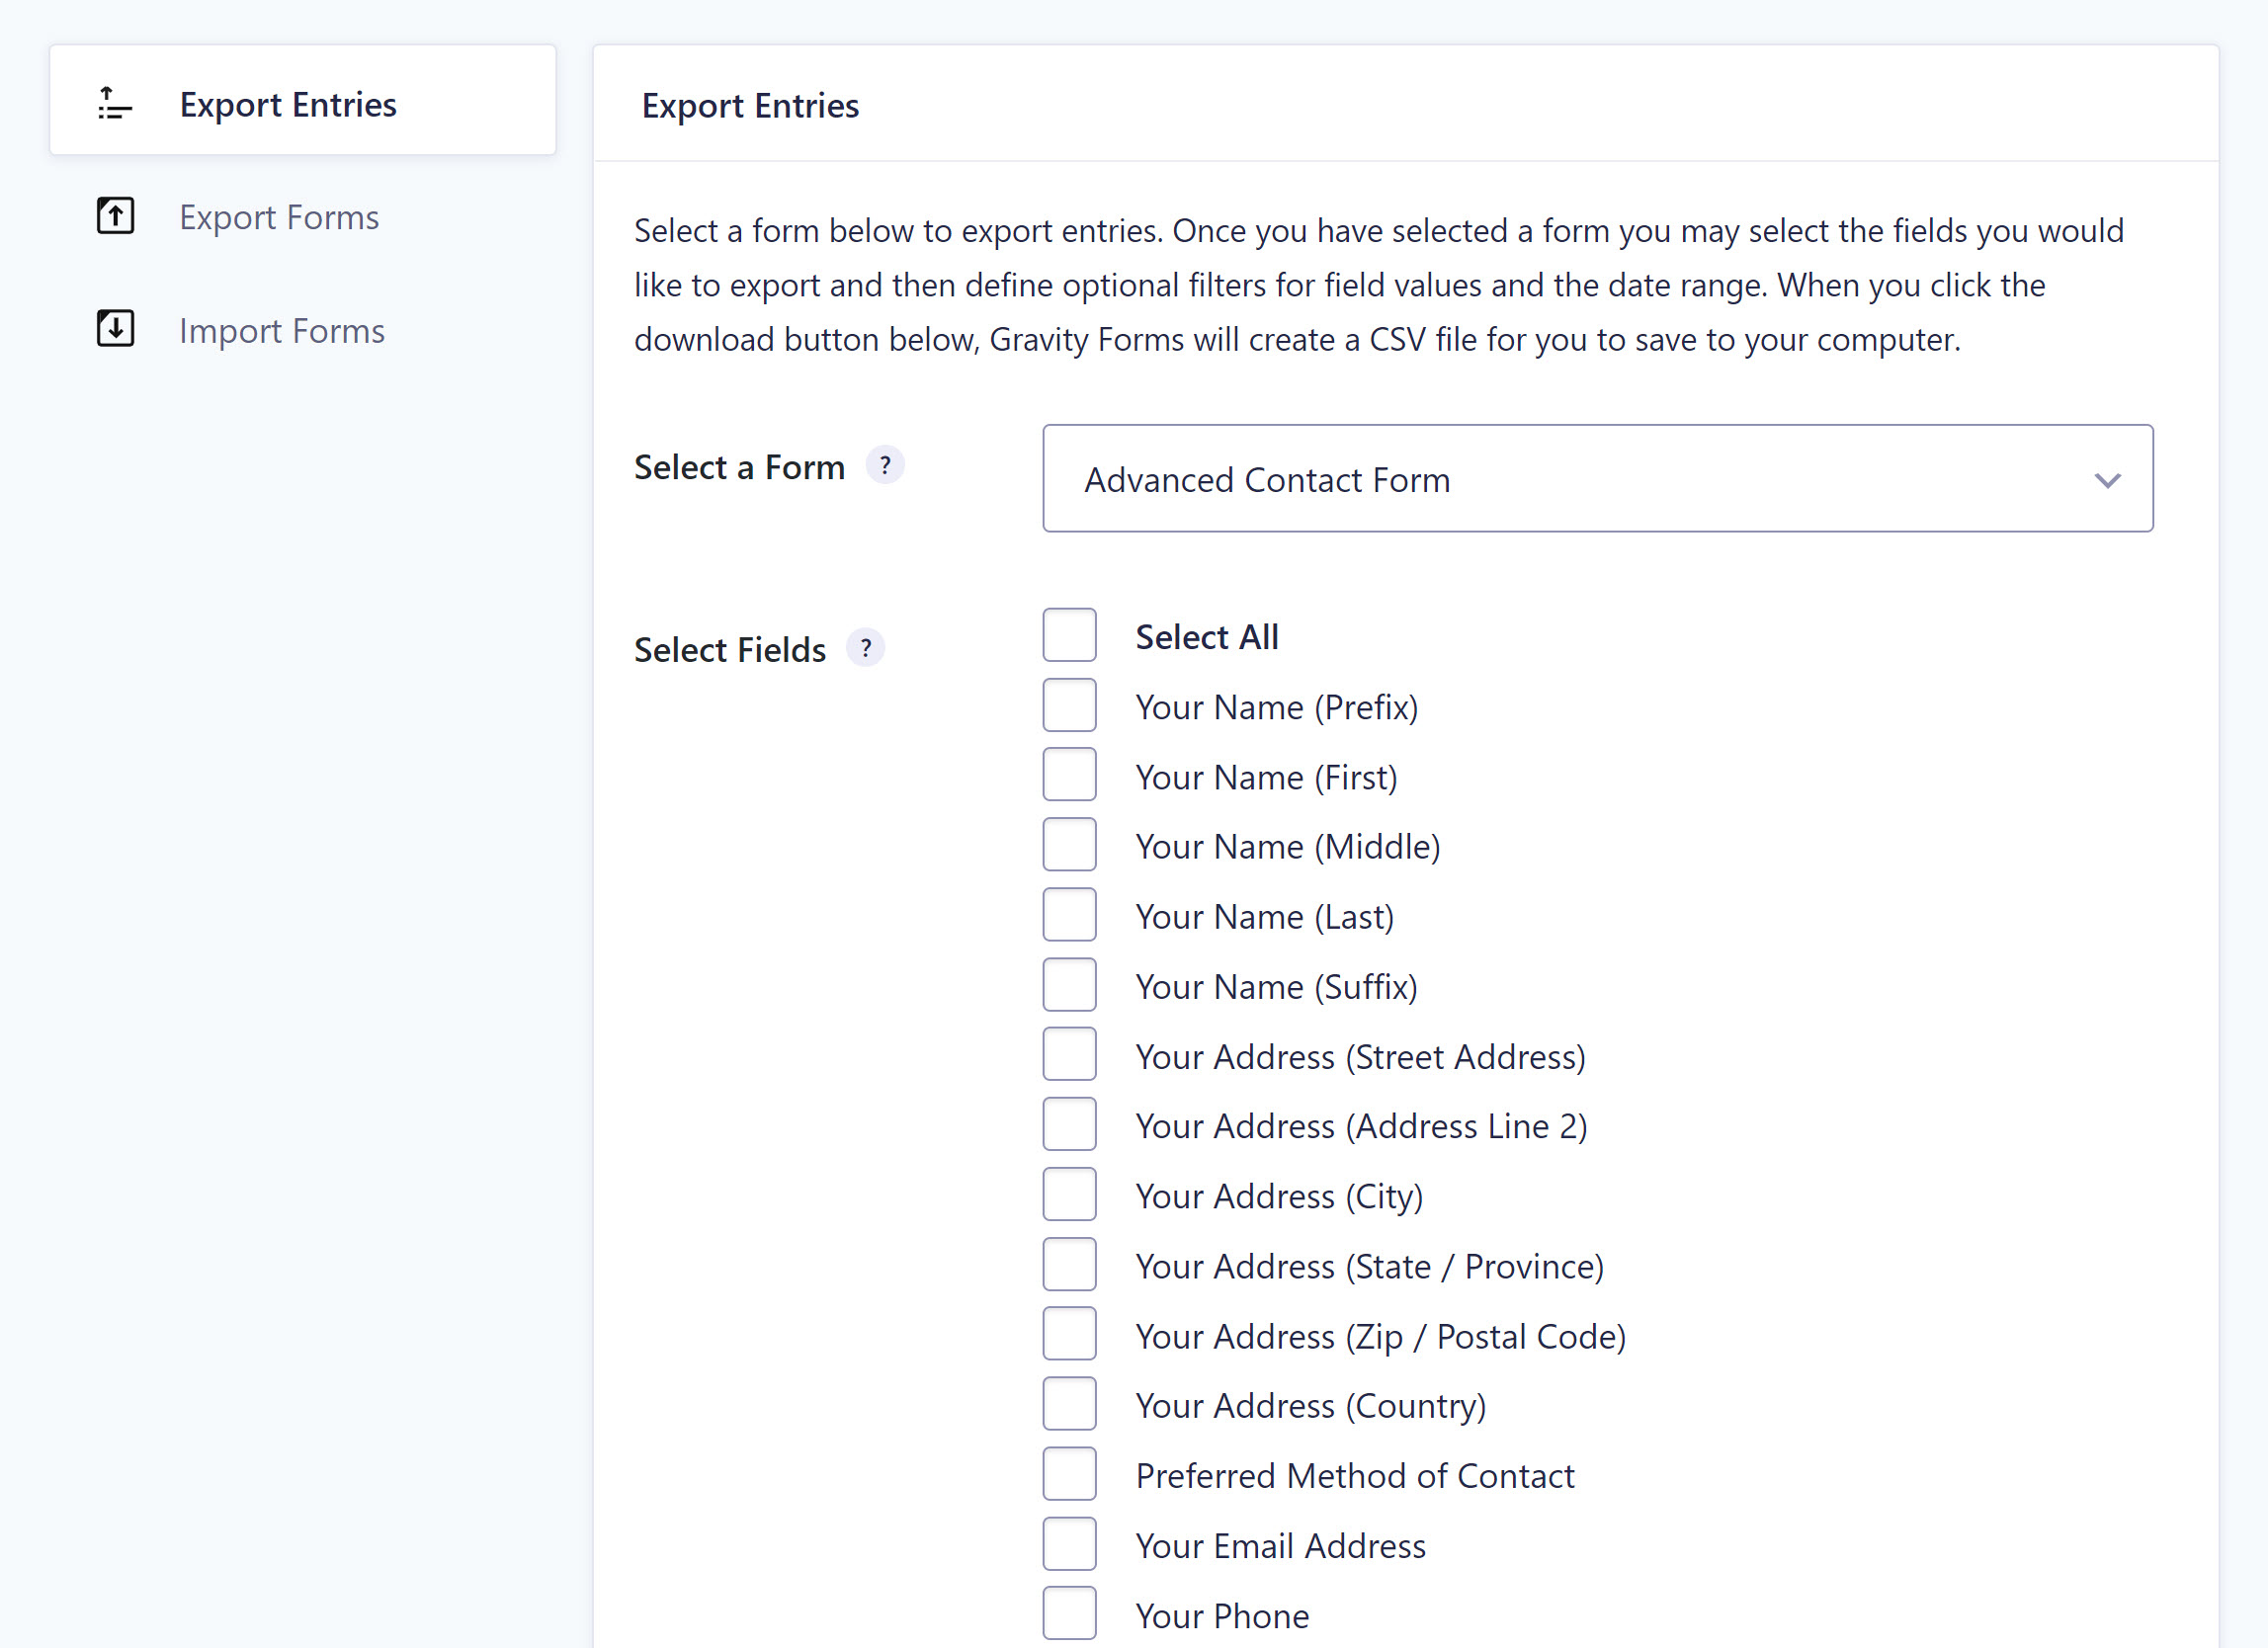
Step 2: Select Form Entries
In this step, you can select the form whose entries you want to export. If you only have a singular form, this step is easy. But if you have multiple forms and you want to export entries for all of them, you’ll need to repeat this and the following steps for each form.
 Either way, select your form from the drop-down menu and then select which fields you want to export. All you have to do is tick the boxes next to the appropriate fields.
Step 3: Configure Additional Export Options
Aside from fields, Gravity Forms allows you to configure additional export options. You can use conditional logic to export only entries if certain conditions are met. For example, you can set up your form to export entries only if the payment has been authorized or paid.
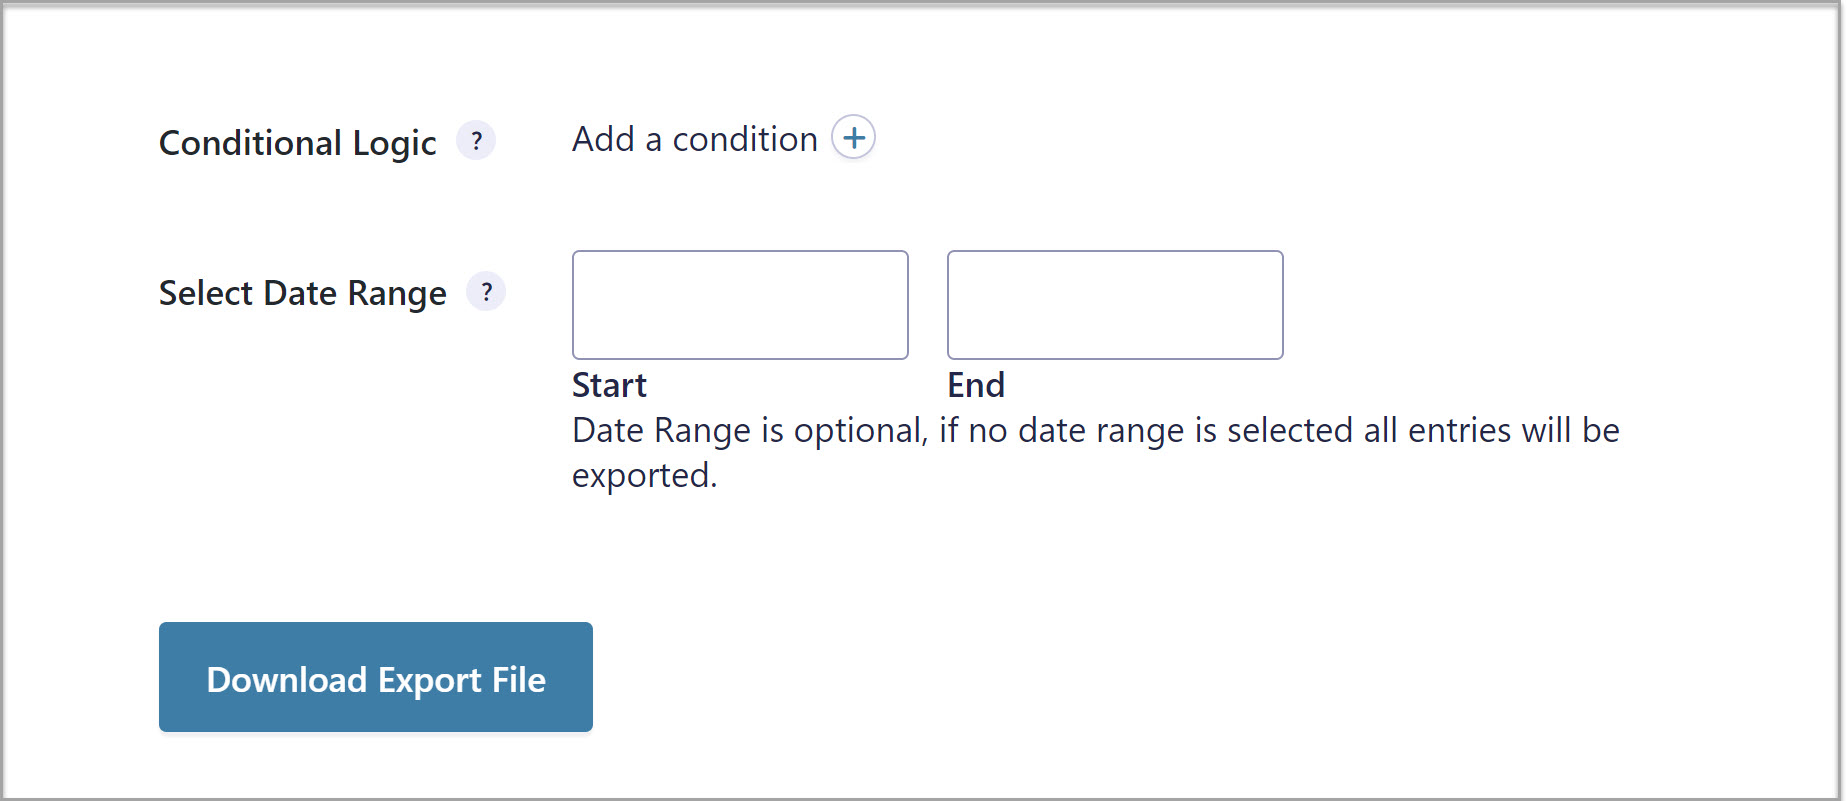 Or, you could export entries only if the preferred method of contact is email or if they choose a specific service. This allows you to export only relevant form entries so you can properly follow up, process, and categorize the entries.
Another option you have when it comes to exporting form entries is to only export entries within a certain date range. This is useful if you have time sensitive entries.
For example, if you’ve run a contest and need to export entries from contest entrants so that you can select and notify the winner. Or, if you conduct a regular annual survey, maybe you want to export entries from that particular year.
Step 4: Download the Export File
Once you’ve configured all the options to your liking, the last step is to download the export file. Click on the blue button and you’ll see a notification prompting you to save the file.
Choose a location on your computer where you want to save it and then press OK. Gravity Forms will then download the export file to your computer. Keep in mind that the file will save in CSV format.
Other Ways to Export Form Entries
As you can see, exporting form entries with Gravity Forms is not difficult at all. However, that’s not the only way to do it. You can also use one of our add-ons to export your form entries or save them in a more convenient place. Let’s take a look at a few of those options now.
Send Your Form Entries To Third-Party Apps
 One useful add-on for Gravity Forms is the Zapier Add-On. Zapier is an automation tool that allows you to automate certain tasks and save time in your workflow. It connects two or more apps together and allows you to send data between those two apps so you don’t have to enter it manually.
For example, you can use the Zapier Add-On in many different ways:
- Automatically create new events in your Google Calendar from new form entries.
- Send form entries to Google Spreadsheets or an app like SalesForce
- Create new Asana tasks from new form entries
The Zapier add-on is available with the Pro & Elite License.
Save Form Attachments To Dropbox
 In some cases, you might need your visitors to upload files along with other information submitted in the form. If that’s the case, you’ll also need a place to store those attachments safely.
That’s where our Dropbox Add-On comes in handy. Once you enable this add-on, all the attachments for that particular form will be saved in your Dropbox account. Keep in mind that for this, you’ll need a form that has the File Upload field.
Another thing to note is that data feeds are form specific. In other words, if you want to store attachments from multiple forms, you’ll need to create separate feeds for each form.
The Dropbox Add-On is available with the Pro & Elite License.
Send Client or Customer Information to HubSpot
 Another example of what you can do with your form entries is to automatically send them to a CRM like HubSpot. Our popular HubSpot Add-On makes it easy to do so.
After enabling this add-on, all you have to do is authorize the connection with your HubSpot account. Then, create the data feed for HubSpot and configure the options to your liking.
You’ll then be able to send contact information directly to HubSpot, assign appropriate lead status to each contact, and follow up with them in a timely fashion using automated email messages that you’ve set up in HubSpot.
The HubSpot Add-On is available with the Basic License.
Manage Form Entries from the Command Line
 The Gravity Forms CLI Add-On allows you to manage your forms, entries, and more, all from the command line. Ideal for our developer community, you can find this free plugin in the WordPress repository ready to install.
The CLI Add-On gives you command line control over your form data, allowing you to create new form entries, delete, duplicate, and edit existing entries, as well as export form submissions, and much more.
For more information on how to use CLI Add-On to export form entries, check out the Gravity Forms documentation.
Automate Data Exports

ForGravity, one of the Gravity Forms Certified Developers, has a premium third-party add-on that will enable you to automate common Gravity Forms tasks, including exporting form entries.
With Entry Automation you can set your form entries to be exported and deleted, on a schedule or on submission. You can also export your data in a range of formats, including CSV, Excel, JSON, and PDF formats, and email data entries to multiple recipients, or select to automatically upload to Amazon S3, Dropbox, or FTP.
Find out more about ForGravity and Entry Automation.
Ready to Start Exporting Your Form Entries?
And there you have it. With Gravity Forms, you can easily export form entries in a multitude of ways. These resources can help you learn more about exporting form entries with Gravity Forms:
- Exporting Form Entries
- How to Send Form Entries to Google Sheets Using Gravity
- This Month’s Featured Add-On… Zapier!
Don’t have Gravity Forms yet? Sign up for a free personalized trial of Gravity Forms and explore all the features and add-ons our plugin has to offer.
Any questions on the Gravity Forms or exporting form entries? Share them in the comments below — we can’t wait to read them!

If you want to keep up-to-date with what’s happening on the blog sign up for the Gravity Forms newsletter!